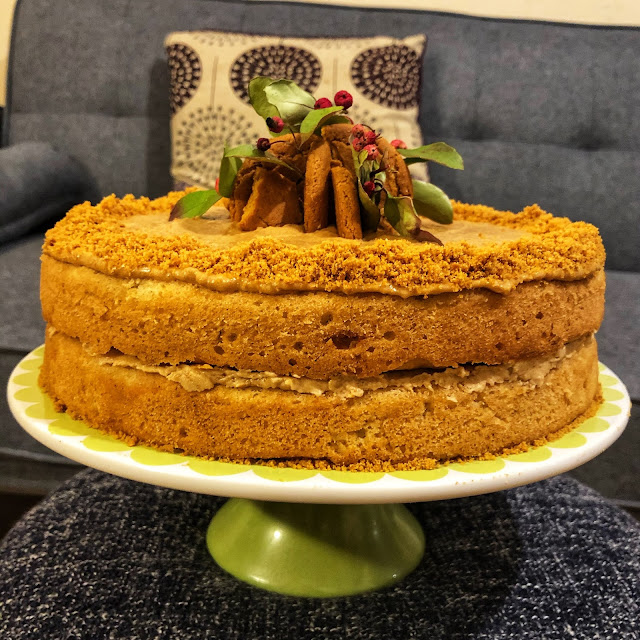
To celebrate my sister's birthday over the weekend, I baked the ultimate ginger nut biscuit cake, incorporating her favourite biscuit - ginger nuts - with two layers of scrumptious fluffy ginger sponge cake. I meaaannn... If you're a ginger nut biscuit fan then this recipe is made just for you.
Ginger Nuts is a brand of biscuits by McVitie's which happen to be accidentally vegan. The biscuits are essentially what most people know as ginger snaps, with a fiery ginger flavour and a hard, crunchy texture. You can get it here for 90p.
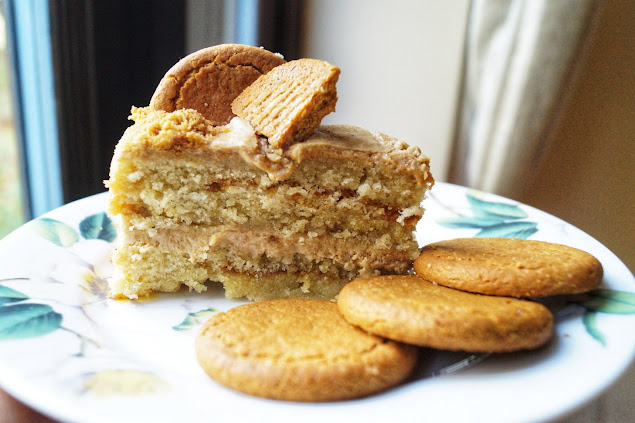
The recipe below makes a two-layer cake that's big enough to serve about 8-10 people. It is baked in such a way that you get the illusion of multiple layers (8 in total!) and I will show you exactly how to achieve this.
As always, if you make this recipe, please share it with me on Instagram for a repost! :)
A Few Notes
- If you do not have access to this particular brand of ginger biscuits, by all means use an alternative brand.
- Unlike my basic vanilla sponge cake recipe, I have used the creaming method (vegan margarine whipped with sugar, as opposed to using vegetable oil) for this cake as I find that it provides a much sturdier cake that's easier to ice and decorate.
- I recommend using an electric hand whisk for several of the steps in this recipe. Click here to see the brand I use. If you don't have access to an electric whisk, use a manual whisk or wooden spoon and be prepared for a good arm workout :)
- If you struggle to find self-raising flour, you can use a blend of all-purpose flour and baking powder. For 4 cups of all-purpose flour, you will need to add about 4 teaspoons of baking powder.
- Non-dairy milk such as almond, soya and cashew add moisture to the cake that you would normally get from eggs.
- Resist the urge to open the oven midway through baking the cake. Doing so will affect the temperature of the oven and may cause your cakes to sink in the middle. Only check after the 20-25 minute mark.
If you like this recipe, you'll also enjoy these other cake recipes:
Ingredients
For the cake
- 1 packet Ginger Nut biscuits (250g)
- 8 tablespoons vegan margarine
- 1.5 cups caster sugar
- 2 tablespoons vanilla extract
- 4 cups self-raising flour
- 1 tablespoon ginger powder
- 1 cup non-dairy milk (e.g. almond, soya - I used cashew milk)
For the buttercream icing
- 3 heap tablespoons vegan margarine
- 2 cups icing sugar
- 1 cup non-dairy milk
Method
Cakes
1. Preheat your oven to 180°C. Line the base of two 20cm (8") sandwich cake tins with parchment paper and grease the sides with a small dab of vegan margarine.
2. Place the ginger nut biscuits in a food processor and blend until you have fine crumbs. Alternatively, you can place the biscuits in a freezer bag, seal, lay flat on a kitchen counter and gently hit with a rolling pin to crush the biscuits. Place the crumbs in a bowl and set aside.
3. In a large mixing bowl, beat the vegan margarine, caster sugar and vanilla extract together until soft and fluffy. I used an electric hand whisk but you can use a wooden spoon to mix thoroughly.
4. Add the self-raising flour, ginger powder and non-dairy milk to the bowl of margarine and sugar. Work quickly to mix the ingredients together until well combined and it forms a thick cake batter.
5. Take the first cake tin and add 1/4 of the cake batter, use a spatula or spoon to spread it out evenly. Sprinkle about 1/4 cup of the ginger nut crumbs over the top then add another 1/4 of the cake batter. Gently use a spatula or spoon to spread the batter evenly until it reaches the edges of the tin. Adding this layer of ginger nut crumbs in between is what gives the cake the illusion of having multiple layers.
6. Repeat step 5 for the second cake tin.
7. Bake the cakes for 25 minutes until a skewer or toothpick inserted in the middle comes out clean. Leave to cool in their tins for 20 minutes then transfer the cakes out onto a wire rack and allow to cool completely.
Icing
1. Place the vegan margarine and icing sugar in a large mixing bowl. Use a wooden spoon to gently beat the mixture until well combined. Then use an electric hand whisk to continue beating until light and fluffy. (If you start off using the electric whisk, you'll likely get a shower of icing all over your face and kitchen counter! So best to start with a wooden spoon)
2. Stir in the remaining ginger nut biscuit crumbs, reserving about 1/4 cup for decoration later. You will see that the icing will thicken drastically. Start to add the non-dairy milk, 1-2 tablespoons at a time, continuing to mix as you do so, in order to loosen the icing and make it creamier. You likely won't need the full 1 cup of milk to achieve this, so you do need to judge by sight. (See my carousel post on Instagram to get an idea of what the buttercream consistency should look like)
Assembly
1. Place the first layer of cake on a cake stand. Spread half the buttercream icing over the top, using an offset spatula to spread it out evenly.
2. Place the second layer on top and spread the rest of the icing over the top, using an offset spatula to spread it out evenly.
3. Decorate the top as you please. I used the remaining ginger nut crumbs to form a ring around the edge on top of the cake, then I broke up some ginger nut biscuits and arranged them in the centre, with some decorative flowers studded in as well. Feel free to be as creative as you want!


This looks so tasty! I want to make it at night to take to work the next day. Is it still fresh the next day or doesn't it keep well?
ReplyDeleteIt will keep well for about a week in the fridge
DeleteI’m delighted to find this recipe. My 4 year old daughter has asked to make a ginger biscuit cake for her dad for Father’s Day and I just didn’t think that would exist and hey presto! We’ll make it tonight - thank you!
ReplyDelete